Friday, March 30, 2018

Surprise Filled Chocolate Bunnies


The smell of chocolate evokes memories of
Easter more than even Christmas.  It reminds me
of the chocolate Easter bunnies we always received
in our baskets, and of memories of my Aunt
Ionia always complaining about how my dad used
to bit the ears off her chocolate Easter bunny
when they were little.  He would just laugh every
time she told on him!

I love to mold chocolate as well as dip it
and I have quite a collection of Easter bunny
molds, vintage metal ones as well as plastic
ones.  Some of the plastic ones I have had for
over 30 years so I guess they technically count
as vintage.  They still have their sticker on them.
I got them for $.75!!


I love to make my own chocolate bunnies, but this 
year I decided it would be fun to make them hollow
and fill them with some treats.

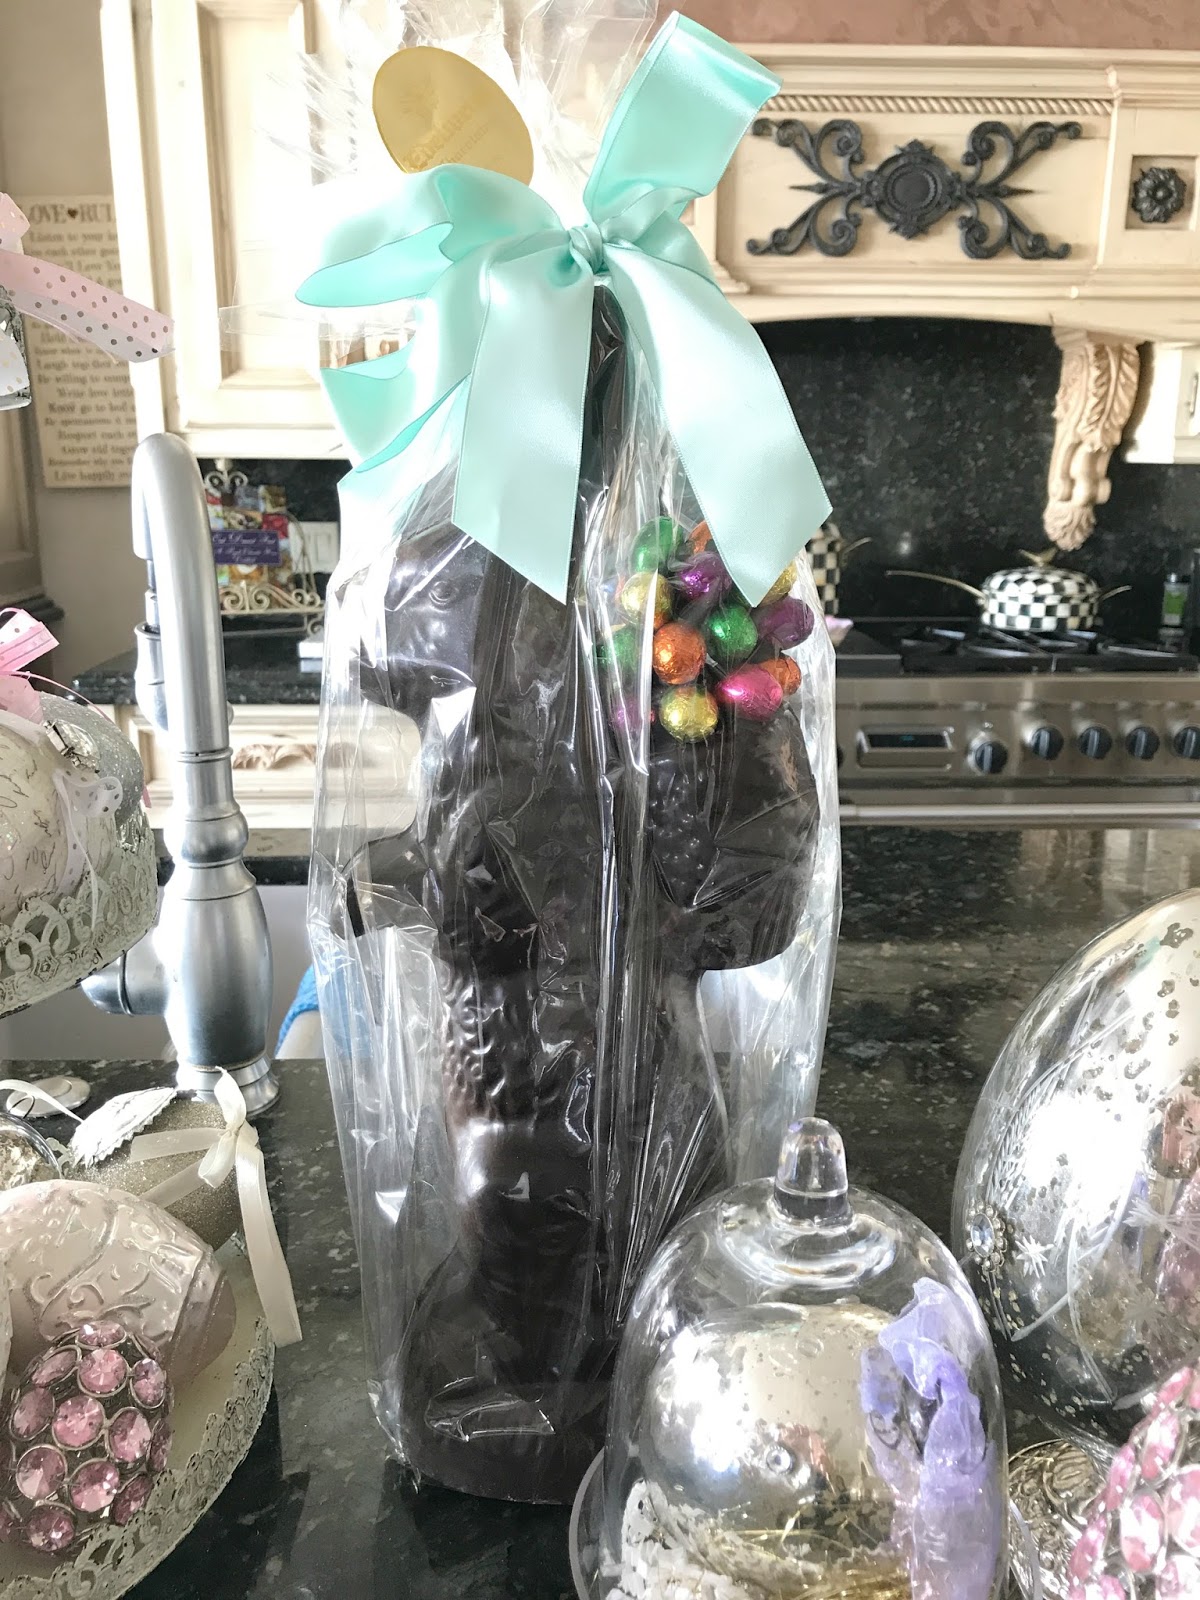
Of course I had to sacrifice one to show you the
treats.  I plan on placing them on top of a cake
and then letting the little ones break them with
a hammer before we slice the cake for Easter Sunday
dinner.


I made up a mixture of favorite Easter candies 
to fill them with.


This is the grand dame of the bunnies.  She takes
about 2 pounds of chocolate to fill.  She is made
from a plastic mold.  

To make the bunnies, melt the temper the chocolate,
or use good quality chocolate coating discs, like
Ghiradelli, and fill half the mold.  Place the mold
pieces together and secure with clips or large
paper clips.  Tilt the mold from side to side to
fill entire mold and shake it to remove bubbles.
Place in fridge for five minutes and then turn 
over to evenly distribute the chocolate.  
Leave in fridge about 15 minutes, and then I
pop it into the freezer for about 5 minutes so
it releases easily from the mold.

Don't worry if you have a problem releasing
one, you can always remelt and try again. 

In order to fill the bunnies with treats, I 
heated a large frosting tip on the stove and
used it to melt a hole in the bottom of the bunnies.


Now she is all ready to fill.


When handling the finished product, use gloves to
keep the heat from your hands from melting
the chocolate.


Next I placed a dab of chocolate on a piece of
parchment paper, big enough to cover the
hole in the bottom of the bunny.  Then quickly
place that over the hole in bunny and then
stand the bunny up while the chocolate dries.

If there is excess chocolate around the base of
the bunny, use a toothpick to cut the excess away
while the chocolate is still liquid.


I had to make a darling white chocolate lamb too.


The bunnies got all dolled up with some eggs and
grass and even a little fondant flower by using melted
chocolate to stick the decorations on.

I can't wait to see the kiddies break open these
fun chocolate bunnies and lamb.

Thanks for stopping by.  I hope your
Easter Sunday is wonderful, filled with the
joy of the resurrection and family and friends.

I will be posting with 


Wednesday, March 28, 2018

Pink and Green Easter Table Two Ways


Are you like me and just love setting the
table for a party?  It definitely is one of my
happy places.  

This table was set for my craft group.  We get
together once a month and craft together.
I feel so lucky to have been invited into
this group.  We were talking about it and it
all started a few years ago at Christmas time
when my friend Laura called and said that
some of them were doing a Christmas home
tour that night, and did I want to come. 

Of course I did!!

But was I also willing to let them come visit
my home.  Well, I had spent the whole day baking
for a church dinner and the counter was a mess,
and the ward dinner started in half an hour, but
hubby pulled through and helped me spiff up
the kitchen and I was able to do both the
ward dinner and the home tour.  That was the
start of our craft group.


Since Easter is this week and we were working
on an Easter craft, I decided to set an Easter table.


Normally I would do fresh flowers to bring
in spring, but I had just purchased these beautiful
silk peonies, so they became the centerpiece, sitting
on a grass runner.


These adorable pink and green dotted bunny plates
were purchased several years ago from Home Goods.
Since I was in junior high, pink and green have been
one of my favorite color combinations for spring.


I sat them on my favorite white wood chargers
from Pier 1.

We were having a fondue dinner so I had
two color coded fondue forks for each person
and a brass basket for scooping out things that
don't skewer that well.


The little white rabbits were a favor for
everyone.  I added the moss green wire
and some flowers.  


A little bunny tag was
used for place cards and two kinds of
flowers and a little hot glue and I
had pretty matching napkin rings.  
I only had four of each napkin and there
are eight of us, so I alternated them.


 These pretty pink goblets were purhased
from Pier 1 a couple of years ago.


The final touch for the table was using
my chiavari chairs and covering them with
curly willow chair covers in blush.  I used these
for our Christmas table and they add such a beautiful
touch.  They are from CV Linens and very
reasonable.


I had used the same plates and goblets
for a table in my dining room with a bunny fur
runner.


I used sterling silver flatware for this fancier
table, and the bunnies were nestled in the fur runner.


This glittering bunny was from Pier 1 last year
and was featured atop a gold embellished marble
cake pedestal.  The table featured three of these.


Our fondue dinner consisted of three courses.
The appetizer course was a Southwest Cheese
and an Italian Pizza Cheese.  The main course
was chicken, steak, shrimp and potstickers cooked
in oil.  The final course was chocolate and caramel
fondue with fruit, brownies and cookies for dipping.


It all finished with creating our Grandin Road
copycat Easter Eggs.  Brenda spent hours figuring
out how to create the harlequin pattern and trace
it on for us.


These were mine.  I painted my butterfly egg
pink and added glittered dots.

Brenda had prepped the eggs by painting them
white, then drawing on the pattern.  The eggs
were from Hobby Lobby.


Karen decided to leave her eggs the original color
from Hobby Lobby and she painted on Mod Podge
and glittered them with Martha Stewart Glitter

It was a fabulous evening filled with fun, food,
crafting and lots of fun conversation.

I hope you have a wonderful Easter.


I will be posting this with


Wednesday, March 14, 2018

Finding the Green and Gold


Even if you can't find the pot of gold at the 
end of the rainbow, you can create your own gold 
on shamrock cookies.


If you want to make some pretty shamrock cookies 
for St. Patrick's Day, a little real, edible gold is perfect.


Or use a little gold glitter dust - and you have found your 
leprechaun treasure.


I found the set of four leaf clover cookies at
Hobby Lobby.  The big one is huge, the smaller one 
is the medium size, and I made a few of the smallest 
ones, but they were a little hard to decorate, but the 
kids would think they were fun.

Hope you can find some gold at the end of the 
rainbow too.


Monday, March 12, 2018

Shamrock Crepes


Looking for a yummy and pretty dessert
to serve to celebrate St. Patrick's Day?

These lovely green crepes are so tender
and delicious and super easy to make.


Accented with a chocolate shamrock and
a handful of mini chocolate chips, these
are the perfect dessert.


I just used my regular crepe recipe with a touch
of green food coloring, and my favorite creamy
crepe filling, also with a touch of green.

Crepe Recipe

4 eggs
1 1/2 C. milk
1 C. flour
1/2 tsp. salt
2 T. melted butter or oil

Place eggs, milk, flour and salt in blender,
and turn on stir.  Blend until smooth and
then add in oil and blend a little more.

Let the batter stand for about 30 minutes to
reduce bubbles.  Stir in green food coloring gel.

Heat a non-stick frying pan on medium high.
Spray with oil.  Pour in about 1/4 C. batter,
and turn the pan to create a thin crepe.  Heat
until it looks dry on the top, then flip and
cook for just a few seconds.  Remove from
pan and let cool.

Crepe Filling

8 oz. room temperature cream cheese,
2 l packages White Chocolate or French Vanilla Instant Jello Pudding
Milk as per directions on pudding packages
12 oz. container Cool Whip, thawed
Green Gel Food Coloring
Mini Chocolate Chips

Whip the cream cheese until smooth.
Prepare the pudding according to package
directions.  Whisk it into the cream cheese.  Fold
the Cool Whip into the pudding mix, adding a little
food coloring gel to create a pretty green.

Spoon some of the filling down the back side
of the crepes.  Sprinkle in a few mini chocolate chips. 
Roll up the crepes, placing the seam side down.

Garnish with additional Cool Whip or 
whipped cream and chocolate shamrocks.

Chocolate Shamrocks

Trace the shape of the shamrocks on 
parchment paper.  I used my small cookie 
cutters for the shape, but you could print them 
off the internet.  Melt chocolate discs and place 
them in a pastry bag with a small tip.  Pipe
the shamrock out, following the pattern.  Let 
cool until hard.


Wednesday, March 7, 2018

Kiss Me I'm Irish Table


St Patrick's Day is right around the corner.
We didn't grow up with a lot of traditions
on St. Patrick's Day.  


Mom would make corned
beef and cabbage, and my parents would tease
about wearing green and who had Irish blood
and who didn't, but that was about it.


So my cabbage plates, which I just adore, are
perfect for my St Patrick's Day table,
as we pull out all the stop for a lush
green table like Ireland itself.


I have been into geneology for years and years
now, and three years ago I took Ancestry.com's
DNA testing.  It shows I have 12 percent Irish
blood.  That is kind of fun to know.


Hubby and I decided to take the DNA testing
because when our children were little the 
pediatrician asked us if we had Mongolian
or Asian blood, as the children had what is
known as a Mongolian spot - a bluish triangle
at the base of their spine.  We wondered whose
side of the family it came from.  Just two weeks
after we had sent off our test, while having a 
family dinner, two nieces on my side of the
family said they had the Mongolian spot, so
we now knew whose side it came from.

As it turned out, I have trace amounts of 4%
from Western Asia - so not a ton of information
regarding that bloodline.


Just some shamrock beads make up our napkin ring on
the St. Patrick's Day table.  Surprise, surprise, hubby is 32 %
Irish, so this table is even more meaningful for him.

For those of you who have seen the Ancestry DNA
testing commercials - a man talks about his German
heritage, how he wore lederhosen and took German
dance lessons, then found out he had no German blood.

Well, hubby's DNA testing came back the same.  His
dad had always said they had a lot of German blood,
but the DNA testing showed absolutely no German
blood.  When we told his dad, he was so upset and
insisted that the Shoemaker's came from Germany.

After looking it up, we found that surname is very
common in other parts of Europe.  It could also come
from someone who migrated to Germany.  It was fun
to see that he also had Italian/Greek blood, Finnish, and
roots from the Iberian Peninsula.  Those were all less
than 5% on his side.


No wonder we love so many international foods!

So although we don't necessarily have days to
celebrate those nationalities, it is fun to pull
out the green to celebrate our Irish heritage and
to know exactly how Irish we are.

Traveling to Ireland is certainly on my
bucket list.  

I will be posting this with


Monday, March 5, 2018

Easter Kitchen Tour


Are you all dressed up for Easter?
Here at Purple Chocolat Home, 
we have started our Easter decor.  

Today I am going to take you to see
some of the Easter that fills the kitchen -
the heart of our home.


This is the center of my large baking cabinet, 
and it is probably my favorite place to decorate
in the kitchen besides the center of the island.


There is always something here that represents
the season, or holiday, or just my love of baking
and dishes.

My MacKenzie Childs canisters were my first
MacKenzie Childs purchase, and they usually
reside right here.


I found these darling MacKenzie Childs egg shaped
candles this year and they fit perfectly into my little 
egg cups.


They just might stay up after Easter comes down,
they look so cute here with the canisters.


Years ago my neighbor and friend found these
vintage chocolate molds at an ice cream 
shop and bought them for me, knowing 
my love for making chocolates.  

She decided she would like some too and 
went back to the store to buy some more
and they said they were no longer for sale.

I was tickled I got these.  They always come
out for Easter.


These imitation chocolate bunnies always
come out too.  I will be making some chocolate
bunnies closer to Easter, but these never melt
or go bad.  Of course little ones always want
to try and take a bite.


A couple of moss covered bunnies are also
placed here.  I love how soft and furry, yet
organic they look.


I love that we installed lighting in this
area.  It accents whatever is on display so well.


Next we go to the center of the kitchen
island.  There is always a fun display here
too.  


The centerpiece here is my chippy white three-tiered
tray that I use for everything.  It is filled with 
eggs that I decoupaged, glass eggs, and pink
crystal eggs.


Right next to it is my giant Edelweiss Chocolate Bunny
that my friend hand carried home for me from Los Angeles.
Hubby keeps bugging me to let him eat it.  Maybe next
year, but only if he will replace it.  I think chocolate 
bunnies were always my favorite on Easter morning.


The Valentine's tree quickly transforms to
an Easter tree to grace the kitchen.


This Easter wreath that I purchased at the
Holy Cow Boutique used to be on my
front door, but since it is almost all paper
crafting, I moved it inside and it is the
center point of the tree.


The boutique has their spring and Easter show
this week.  I hope to find some more of this 
woman's work.  


I looked last year, but didn't find anything.
I am going first thing when it opens, just
in case I was too late last year.


It is just a treasure trove of beautifully
crafted pieces.


Mama and daughter Kitchenaids 
fill one corner of the counter
and a little Easter bowl accents them.


There isn't a whole lot new in the kitchen
this year, but I still enjoy arranging everything
in new ways.  This little guy is new though,
and he quite charms me!

Thanks for coming to visit to see my Easter kitchen.

I hope you are having fun decorating too.


Follow me on Instagram