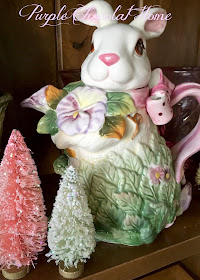
Yes, we have a forest of glittering bottle brush trees
at Purple Chocolat Home for Easter decor!
Are these just the cutest?
Bottle brush trees are just so enchanting.
I have never tried making them before
and had the opportunity to be invited to
a crafting night at Joanne's house.
Joanne worked as a manager at Hallmark stores
for years and years and she has quite the marvelous
collection of everything. This is her Easter mantel.
She made the lovely handkerchief and vintage glove
swag for her fireplace with vintage flowers tucked into
the gloves. I definitely want to make this.
Joanne invited us over to make bottle brush
Easter trees. None of us had ever made them before.
What a fun evening of crafting we had and we found
out these were so easy.
Laura went right home and decorated her mantel
with the Easter bottle brush trees and a banner that
Joanne had made her.
When we arrived she had eight trees for each of us.
Two she had left unbleached so we could do it and
see how easy it was. The other six she had bleached
for us so we could work quickly.
First remove the little wooden base. She told us that
synthetic trees will not accept color and that a clue
to whether your tree was natural fiber or synthetic was
whether it had wood bases or plastic. Ours have wood.
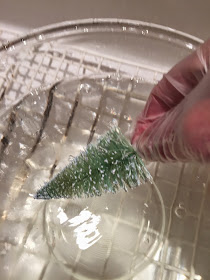
Put gloves on and dip in a bowl with a mixture
of 3/4 part bleach to 1 part water. This bleaching
process only takes a few minutes so watch them. If you want
a mint green tree, remove it before the color is
all gone.
Rinse the tree in water and then dip in another
bowl of white vinegar. Rinse again and let dry.
We cheated and used a blow dryer to help
ours dry more quickly.
Then dip in a bowl of dye. The dye is made by
placing enough water in the bowl to cover your
tree and mixing in some powdered Rit Dye until
you get a dark rich color.
Rinse again. You can dip again if you want the
color a little darker.
Then dip again in vinegar and rinse again.
After the trees are dried, replace the wooden base and
brush with a little Mod Podge.
You may need to use a little craft glue to replace
the bases on some.
Sprinkle glitter over the tree. It will stick to the
Mod Podge. Shake off excess glitter.
Let the glue dry. It will dry clear.
Joanne took some of hers up a notch and
placed them in old salt and pepper shakers
that she blinged up. I definitely want to
do this!
Scatter your little Easter bottle brush trees
around the house to make your vignettes sparkle
and come alive. The softness of the natural brushes
really adds to any vignette you place them in.
I have them in my kitchen and living room
and I realize I need more!
We decided we preferred the clear glitter to
the gold glitter as in the demonstration tree.
The clear lets the pastel colors shine through.
I will be sharing this with


What a cute idea for the bottle brush trees. The pastel colors are perfect for the Easter decorations.. Love the mantel and the cute bunnies.. Have a happy day and week ahead!
ReplyDeleteI absolutely love these and plan to make some for Christmas! thank you for the tutorial. I would love for you to join our new weekly party on Thursdays called "Share Your Style". and share your sweet Easter tres. Have a wonderful week.
ReplyDelete...now to root around for the trees it seems I just packed away!
ReplyDeleteYou always come up with fun, fairly easy ideas, Jacqueline. Thanks for sharing.
Have a wonderful week.
What a fun thing to do with friends..:) Her mantle is so sweet:) Everything is!
ReplyDeleteYou girls amaze me! You two are consistently creating and sharing with others, and these little bottle brush trees are adorable. I think I have some pastel ones in with my Christmas / Winter village. I need to pull them out and let them do double duty. '-)
ReplyDeleteThanks for sharing the process.
The mantels and vignettes are inspiring me to get busy on my own Easter decor. Thanks!
I have never seen these trees decorated for Easter...just lovely!
ReplyDeleteHow absolutely lovely! The colours are simply gorgeous, and the pastels are calling my name. Can you tell I'm in a PINK swirl of life in all things right now? Spent most of Saturday looking at cabinets and countertops---pink swirl marble a possibility.
ReplyDeleteAnd how do you find the wooden-based ones---are those vintage, or can you buy that type still?
And I have a dresser-drawer full of ancient hankies and gloves---what a wonderful little project!
r
PS Sending you an e-mail re: cups.
What a fun idea! Thank yo for sharing. Your friend sounds amazing, just like you! :)
ReplyDeleteBlessings on your week!
Beverly
I picked up a huge bag of these trees after Christmas 2 years ago but...plastic bases. :-(
ReplyDeleteWhat a fun craft to do with some friends and the banner of hankies and gloves is very nice.
Thank you for linking to Mosaic Monday Jacqueline.
I bleached some trees this Christmas but haven't tried bleaching them yet. Love them!
ReplyDeleteVery fun, and I love that some of your colors are a little more vibrant! I'll bet this was a great group project:@)
ReplyDeleteJaqueline -- these are the cutest little trees! I just love the pretty colors! :)
ReplyDeleteYOu have done a WONDERFUL job decorating for Easter. I LOVE those little bottle brush trees. Everything is darling. xo Diana
ReplyDeleteGreat job creating these...I love all the pretty spring colors and all that yummy glitter, I think I will have to give it a try...thanks for the tutorial....
ReplyDeleteSmiles~
Mari
Jacqueline, These pastel glittered trees are just adorable for Easter! Thanks so much for the tutorial and sharing your friend's sweet mantle with her hanky and glove swag! I've pinned!
ReplyDeleteWhat a fun and adorable craft project. Love the glitter look. Endless possibilities. The mantels are lovely. Your friend was so sweet to invite all of you over to share these adorable trees.
ReplyDeleteThe trees are adorable and the mantles just beautiful.....now you've inspired me!!
ReplyDeleteHere's a hint, at the end of the Easter season buy up the egg coloring kits. I like the ones with the 'pills' of colors. I use these to dye the trees, dye coffee filters, ribbons, etc......its a lot cheaper to buy than the large size of dye.
You did a marvelous job on your easter display. I have brush Cristmas trees, but not one for Easter. Yours look so pretty.
ReplyDeleteI am in love with those bottle brush trees! I have bleached them before but never thought to give them color and glitter. Thank you for sharing the how to and the wonderful Easter-scapes!
ReplyDeleteThe trees are great Did it one time never colored them that is great. I will be back HPS
ReplyDeleteLaura
This looks like such a fun project and I can see me getting carried away with it!
ReplyDeleteThis is such an excellent tutorial! Thank you for sharing.
ReplyDelete