Ok, I promised I would teach the burnt satin roses that are all the rage.
You might remember these from my summer bags.
If you would like the tutorial for these easy bags,
click here.

My extremely creative daughter-in-law got on my blog and
followed the directions for the Summer Bag and made this
stunning bag out of satin and soft fur. Isn't she amazing.
It's her church bag, what a lucky girl!
Notice that she used twice the amount of fabric
to make the straps cute and gathered.
She also made this one for herself, including the rose out of silk.
This is a rose on my Simple Sassy Summer Skirt. Several have asked for
directions on the skirt. I will follow with a tutorial on it.
Start with 1/8 to 1/4 yard of satin of your choice.
Press out any wrinkles.
Cut about a 2 inch x 6 inch length and fold in half.
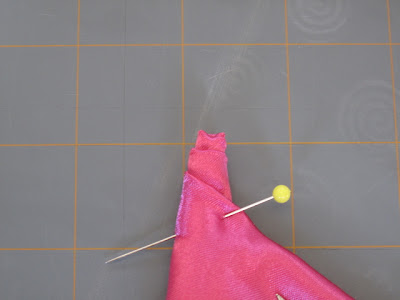
Fold it in about the middle to make a point, like the center
of a rosebud.
Wrap one side around the point several times to create
the center of the rose. You can skip this part if you want
to put a jewel or a button in the center.
Thread your needle in a matching thread and secure the
rosebud by passing through the center several times.
Tie a knot but keep the thread attatched.
Cut 3 oval shaped petals about 2 inches long.
All of your cutting can be kind of rough so that the
petals looks more natural.
Now the fun begins!
Don't let your little ones watch you do this. They will
think fire is too much fun!
Holding the petals with the shiny side facing the flame, run
the edge of the petal through the flame. It doesn't matter if
you get a little brown on the edge. It looks good that way.
This goes really fast. Watch for it catching on fire, though.
Now cut 4 layers of netting in a rough circle, about 3 inches across.
Sorry, the netting drives the focus crazy!
Turn the petals quickly. I hold all
4 petals together and melt them. Then I separate
them and move them a little so they don't all lie
the same way.
Next cut 3 roughly shaped "circles" - make the edges
go in and out a little - about 3-31/2 inches across.
Burn the edges again.
Now cut 4 layers of netting in rough circles about 4 inches across.
Burn the edges.
Finish with 2 butterfly shaped petals about 4 1/2 inches across.
Burn the edges.
Layer the pieces starting with the largest and going up. I chose
to place my netting on top of the 3 petals.
Then place your center on. Notice the thread is still attatched.
If you are putting a jewel on, skip that step.
Pinch the first two layers of petals around the bud and
push your needle through to the back side, then take several
stitches to make sure you secure all the petals.
Continue with a layer of petals, pinching a little as you secure them onto
Cut a small one inch circle and burn the edge. Secure it to the
Add a pin to the back

"Lucy" here is sporting the latest trend - pin your rose on a
string of beads.
Experiment with colors and materials. This one has
three small black beads sewn in the center and a few bits
of roughly-cut lace. It has pale purple and black satin petals
just done in circles.
Whew!!
I finally finished blogging - time for a little retail therapy!
Let me know how it goes. I love to hear from you.
I will be posting this on Just Something I whipped Up Monday
and
and
Simply Sweet Home's Friday Favorites


Jacqueline, thanks for the rose tutorial. Even though I am a bit challenged in this area, I DO think I could do one. Audra's bags are really cute...love your sandals. Joni
ReplyDeletefantastic tutorial, I always wanted to know how to do that. I love the little girl purse too. You have a lovely blog, I enjoyed visiting (my first time!)
ReplyDeleteBest,
Jenn
Those flowers are beautiful! I especially love the look on the necklace! When school ends, I'm going to give this a try for sure! Thanks for sharing!
ReplyDeleteJackie thanks now I can finish the skirt I am making. I am excited!!! I love love love the the burnt satin roses. So many fun things to do with them. Endless.
ReplyDeleteWow!! I'm in love with your blog! thanks for stopping by my blog, I'm your newest follower:)
ReplyDeleteyou make this look simple and I love the look of the flower. Plus with the added netting layer it gives it more texture. So cute.
ReplyDeleteCute stuff in this post! And a great tutorial!
ReplyDeleteThanks for linking up for Friday Favorites!
Darling...darling darling..the little girl:) And the skirt and the purse and the flowers:)
ReplyDeleteUtterly lovely!
ReplyDeleteYou are so talented to make all these beautiful things. Thanks for taking the time to make the great tutorial. I love the step by step instructions. I am going to try the roses and the frame idea. These will make great gifts. Now that I saw your cute sandals with your cute hot pink polish......I realized I must give myself a pedicure!!!!
ReplyDeleteHug,
Katherine S.